公式のExamplesを写経して理解したことをメモる#
Bevy(v0.18)でのShader勉強のメモ。Bevy は WebGPU (wgpu クレート) を使っているのでそっちも理解する必要がある。
次のバージョンで RenderGraph は消え、ECSのシステムによる表現に置き換えられる ため、 RenderGraph 関連を差っ引いて読む。
状況メモ:
- WebGPUの概観をつかむため、 WebGPU のチュートリアルの"基本" 読み、
- Rustでの扱い方を学ぶため
wgpuチュートリアル の Beginner / The Depth Buffer まで読んだ - そろそろBevy上でシェーダ触るか、ということで公式Examplesを写経し、何をどのように触れるのかを理解する
- …が、しかし、Advancedなサンプルコードはwgpu(ひいてはWebGPU)への習熟を前提としている。そのため、WebGPUの基礎をもう少し読み進めることとする:/unsorted/learn-shader_note。
- 再開
- github にコードを置く
- Sandbox を作って遊ぶ
- bevy0.19 がそろそろ…
Animated#
独自のフラグメントシェーダを適用する例。シェーダへの固有のInputなし。
フラグメントシェーダ内では mesh_view_bindings を通して時間を受け取っている。この時間を使ってアニメーションする。
独自のフラグメントシェーダを適用するために、 bevy::pbr::Material トレイトを実装する。これはどのようにレンダリングされるかを表現するトレイト。
レンダリングの対象となるメッシュを持つ Mesh3d コンポーネントに対し、 Material を MeshMaterial3d コンポーネントに包んで対応付けする。これを MaterialPlugin のシステムがレンダリングしてくれる。
Material は AsBindGroup をともに実装する必要がある。
bevy::render::render_resource::AsBindGroup トレイト&deriveマクロはBindGroupを表現するトレイトと、それを宣言的に実装するderiveマクロ。シェーダに渡したいリソースを表現する。
StandardMaterial などはこれらを実装している。
サンプルのフラグメントシェーダ内にて mesh_view_bindings::globals を #import ( naga_oil ? ) している。これは WGSL 自体の機能ではないらしい。LSPの支援を得ようとすると設定に苦労しそう。
WESL が使えるようなので、そちらを選択する手もあるかも? 'wgsl-analyzer' は WESLも experimentalだがサポートしているとか。あとで写経してみる。
→ 0.18 時点ではやはり実験的であるっぽい。 bevy_pbr の import ができなかった。
WESL#
シェーダ言語を WESL とする例。
import と @if の例が入っている。
WESLを使えるようにするには bevy の feature: "shader_format_wesl" を立てる必要あり。
0.16から入った機能であり、まだExperimentalであるらしい。
PRに下記注意事項がある。どこまで解消されているかわからないが、 import bevy_pbr::... はうまくいかなかったので、 Extended material を WESL に書き換えるのはできないっぽい。
Right now, we don't support mixing naga-oil. Additionally, WESL shaders currently need to pass through the naga frontend, which the WESL team is aware isn't great for performance (they're working on compiling into naga modules). Also, since our shaders are managed using the asset system, we don't currently support using file based imports like super or package scoped imports. Further work will be needed to asses how we want to support this.
import#
wesl から別の wesl を import するメカニズム。
custom_material.wesl にて util.wesl から import した関数を呼びだしている。
custom_material.wesl
import super::util::make_polka_dots;
// 中略
fn fragment(
    mesh: VertexOutput,
) -> @location(0) vec4<f32> {
    return make_polka_dots(mesh.uv, material.time.x);
}
Rust側にて事前に util.wesl をロードしておく必要がある。例ではロード後、解放されないようリソースにハンドルを保持している。
main.rs
impl Plugin for CustomMaterialPlugin {
    fn build(&self, app: &mut App) {
        let handle = app
            .world_mut()
            .resource_mut::<AssetServer>()
            .load::<Shader>("shaders/util.wesl");
        app.insert_resource(UtilityShader(handle));
    }
}
なお、事前のロードを削除してみると custom_material.wesl ロード時に ModuleNotFound エラーが発生する。
thread 'Async Compute Task Pool (0)' (29112) panicked at /home/mori/.cargo/registry/src/index.crates.io-1949cf8c6b5b557f/bevy_shader-0.18.0/src/shader_cache.rs:238:30:
called `Result::unwrap()` on an `Err` value: Error(Diagnostic { error: ResolveError(ModuleNotFound(ModulePath { origin: Absolute, components: ["shaders", "util"] }, "Invalid asset id")), detail: Detail { source: None, output: None, module_path: Some(ModulePath { origin: Absolute, components: ["shaders", "custom_material"] }), display_name: None, declaration: None, span: None } })
@if#
Conditional Translation :
WESLのtranslator にパラメタを渡し、1つのweslコードから複数のバージョンの出力コードを得る方法らしい。
Rust の #[cfg(feature = "...")] 構文に似たもの、とのこと。
WESL の translaator がどのタイミングで動作するものかが気になるところ。
ちゃんと確認して無いが、 RenderPipelineDescriptor にてパラメタを渡している点をみるに、
レンダーパスを生成~描画する度に translation する機会があるとみてよさそうである。
例では、Spaceキー押下により util.wesl の関数の動作を切り替えている。
util.wesl
    @if(!PARTY_MODE) {
        let color1 = vec3<f32>(1.0, 0.4, 0.8);  // pink
        let color2 = vec3<f32>(0.6, 0.2, 1.0);  // purple
        dot_color = mix(color1, color2, is_even);
        is_dot = step(dist_from_center, 0.3);
    } @else {
    // 略
Rust側はなかなか面倒そう?
カスタムしたマテリアルの Material::specialize() にてRenderPipelineDescriptor を書き換え、そこでパラメタを渡している。
impl Material for CustomMaterial {
    // 略
    fn specialize(
        _pipeline: &MaterialPipeline,
        descriptor: &mut RenderPipelineDescriptor,
        _layout: &MeshVertexBufferLayoutRef,
        key: MaterialPipelineKey<Self>,
    ) -> Result<(), SpecializedMeshPipelineError> {
        let fragment = descriptor.fragment.as_mut().unwrap();
        fragment.shader_defs.push(ShaderDefVal::Bool(
            "PARTY_MODE".to_string(),
            key.bind_group_data.party_mode,
        ));
        Ok(())
    }
}
key.bind_group_data には Material の bind_group_data() にて作成したものが入っている。 これを使って CustomMaterial のフィールドの値を渡している。
main.rs : #[bind_gropu_data(CustomMaterialKey)] を指定し、 &CustomMaterial から CustomMaterialKey を生成可能にすることで上記 key として渡せる。
// This is the struct that will be passed to your shader
#[derive(Asset, TypePath, AsBindGroup, Clone)]
#[bind_group_data(CustomMaterialKey)]
struct CustomMaterial {
    // Needed for 16 bit alignment in WebGL2
    #[uniform(0)]
    time: Vec4,
    party_mode: bool,
}

#[repr(C)]
#[derive(Eq, PartialEq, Hash, Copy, Clone)]
struct CustomMaterialKey {
    party_mode: bool,
}

impl From<&CustomMaterial> for CustomMaterialKey {
    fn from(material: &CustomMaterial) -> Self {
        Self {
            party_mode: material.party_mode,
        }
    }
}
Extended material#
MaterialExtention とExtendedMaterial<...> による既存マテリアル拡張作成の例。
既存の Material をもとにデータを追加、
Vertexシェーダ and/or Fragmentシェーダを置き換えたマテリアルを作成することが可能となる。
既定のPBRのライティング処理後、その結果にノイズを乗せる、みたいなこともできる(はず)。
例では StandardMaterial のFragmentシェーダを置き換えている。データに量子化ステップ数(u32)を1つ加え、Fragmentシェーダにてライティング処理後の色を量子化するなどしている。
// we can optionally modify the lit color before post-processing is applied
out.color = vec4<f32>(vec4<u32>(out.color * f32(my_extended_material.quantize_steps))) / f32(my_extended_material.quantize_steps);
既存のシェーダの機能は関数をimportして呼び出す形となる。これをもってデフォルトのPBRシェーダの部分的変更を行える。
#import bevy_pbr::{
    pbr_fragment::pbr_input_from_standard_material,
    pbr_functions::alpha_discard,
}
// 略

@fragment
fn fragment(
    in: VertexOutput,
    @builtin(front_facing) is_front: bool,
) -> FragmentOutput {
    // generate a PbrInput struct from the StandardMaterial bindings
    var pbr_input = pbr_input_from_standard_material(in, is_front);

    // 略

    // alpha discard
    pbr_input.material.base_color = alpha_discard(pbr_input.material, pbr_input.material.base_color);

    // 略

    var out: FragmentOutput;
    // apply lighting
    out.color = apply_pbr_lighting(pbr_input);
        // apply in-shader post processing (fog, alpha-premultiply, and also tonemapping, debanding if the camera is non-hdr)
    // note this does not include fullscreen postprocessing effects like bloom.
    out.color = main_pass_post_lighting_processing(pbr_input, out.color);

    // 略

    return out;
}
Rust側は 拡張部分を MaterialExtension にて定義すると、 ExtendedMaterial<B, E> が拡張マテリアルとなるため、これをカスタムのマテリアルとして使う。
MaterialPlugin::<ExtendedMaterial<StandardMaterial, MyExtension>>::default()
既存マテリアルの拡張である関係上、 データ追加時はバインディングの衝突に注意が必要となる。 あとはカスタムマテリアル(Animatedでの例) と変わらない。
#[derive(Asset, AsBindGroup, Reflect, Debug, Clone, Default)]
struct MyExtension {
    // We need to ensure that the bindings of the base material and the extension do not conflict,
    // so we start from binding slot 100, leaving slots 0-99 for the base material.
    #[uniform(100)]
    quantize_steps: u32,
// ...
}

impl MaterialExtension for MyExtension {
    fn fragment_shader() -> ShaderRef {
        SHADER_ASSET_PATH.into()
    }
// ...
}
ex-1#
https://github.com/ashiojin/learn-shader/tree/main/ex-1-generate-pattern
PBRのInputを書き換えてチェッカー柄を作った例。各矩形内の一部をメタリックに。
WGSL:
#import bevy_pbr::{
    pbr_fragment::pbr_input_from_standard_material,
    pbr_functions::alpha_discard,

    pbr_types::PbrInput,
}

#ifdef PREPASS_PIPELINE
#import bevy_pbr:: {
    prepass_io::{VertexOutput, FragmentOutput},
    pbr_deferred_functions::deferred_output,
}
#else
#import bevy_pbr:: {
    forward_io::{VertexOutput, FragmentOutput},
    pbr_functions::{apply_pbr_lighting, main_pass_post_lighting_processing},
}
#endif

struct MyMaterial {
    x: u32,
#ifdef SIXTEEN_BYTE_ALIGNMENT
    _webgl2_padding_8b: u32,
    _webgl2_padding_12b: u32,
    _webgl2_padding_16b: u32,
#endif
}

struct Pattern {
    base_color: vec4<f32>,
    metallic: f32,
}
fn make_pattern(
    x: u32,
    color_1: vec4<f32>,
    color_2: vec4<f32>,
    metallic_1: f32,
    metallic_2: f32,
    uv: vec2<f32>,
) -> Pattern {

    // checker
    // +----+----+
    // | 0  | .5 |
    // +----+----+
    // | .5 | 1  |
    // +----+----+
    let checker_ = step(vec2<f32>(0.5), fract(uv * f32(x))) * 0.5;
    let checker = checker_.x + checker_.y;

    // checker_x2 is each cell is divided into 4 sub-cells of `checkr`
    // +----+----+
    // | 0  | 0  |
    // +----+----+
    // | 0  | 1  |
    // +----+----+
    let checker_x2_ = step(vec2<f32>(0.5), fract(uv * f32(x) * 2.0));
    let checker_x2 = checker_x2_.x * checker_x2_.y;

    let base_color = mix(color_1, color_2, checker);
    let metallic = mix(metallic_1, metallic_2, checker_x2);

    var pattern = Pattern(base_color, metallic);
    return pattern;
}

@group(#{MATERIAL_BIND_GROUP}) @binding(100)
var<uniform> my_material: MyMaterial;

@fragment
fn fragment(
    in: VertexOutput,
    @builtin(front_facing) is_front: bool,
) -> FragmentOutput {
    var pbr_input = pbr_input_from_standard_material(in, is_front);

    let uv = in.uv; // If `VERTEX_UVS_A` is't defined, it causes a compile error!
    // https://github.com/bevyengine/bevy/blob/e696fa75260d52129df53db4328aca64c068d613/crates/bevy_pbr/src/render/forward_io.wgsl#L38
    let pattern = make_pattern(my_material.x,
        pbr_input.material.base_color,
        vec4<f32>(0.5, 0.5, 0.5, 1.0),
        pbr_input.material.metallic,
        1.0,
        uv);

    // Mofiy the PBR input based on the pattern
    pbr_input.material.base_color = pattern.base_color;
    pbr_input.material.metallic = pattern.metallic;

    // alpha discard
    pbr_input.material.base_color = alpha_discard(pbr_input.material, pbr_input.material.base_color);

#ifdef PREPASS_PIPELINE // -------------
    let out = deferred_output(in, pbr_input);
#else // -------------------------------
    var out: FragmentOutput;
    out.color = apply_pbr_lighting(pbr_input);

    // Apply in-shader post processing
    out.color = main_pass_post_lighting_processing(pbr_input, out.color);

#endif // ------------------------------

    return out;
}
呼び出し側:
// 略

fn setup(
    mut commands: Commands,
    mut meshes: ResMut<Assets<Mesh>>,
    mut materials: ResMut<Assets<ExtendedMaterial<StandardMaterial, MyExtension>>>,
    mut standard_materials: ResMut<Assets<StandardMaterial>>,
) {
    // extended
    commands.spawn((
        Mesh3d(meshes.add(Sphere::new(1.0))),
        MeshMaterial3d(materials.add(ExtendedMaterial {
            base: StandardMaterial {
                base_color: RED.into(),
                opaque_render_method: bevy::pbr::OpaqueRendererMethod::Auto,
                ..default()
            },
            extension: MyExtension::new(7),
        })),
        // MeshMaterial3d(standard_materials.add(StandardMaterial {
        //     base_color: GREEN.into(),
        //     opaque_render_method: bevy::pbr::OpaqueRendererMethod::Auto,
        //     ..default()
        // })),
        Transform::from_xyz(-1.0, 0.5, 0.0),
    ));

    // standard for comparison
    commands.spawn((
        Mesh3d(meshes.add(Sphere::new(1.0))),
        MeshMaterial3d(standard_materials.add(StandardMaterial {
            base_color: RED.into(),
            opaque_render_method: bevy::pbr::OpaqueRendererMethod::Auto,
            ..default()
        })),
        Transform::from_xyz(1.0, 0.5, 0.0),
        Rotate,
    ));

// 略
}
// 略

#[derive(Asset, AsBindGroup, Reflect, Debug, Clone, Default)]
struct MyExtension {
    #[uniform(100)]
    x: u32,
    #[cfg(feature = "webgl2")]
    #[uniform(100)]
    _webgl2_padding_8b: u32,
    #[cfg(feature = "webgl2")]
    #[uniform(100)]
    _webgl2_padding_12b: u32,
    #[cfg(feature = "webgl2")]
    #[uniform(100)]
    _webgl2_padding_16b: u32,
}
impl MyExtension {
    fn new(x: u32) -> Self {
        Self {
            x,
            ..default()
        }
    }
}

const SHADER_ASSET_PATH: &str = "shaders/my_material.wgsl";
impl MaterialExtension for MyExtension {
    fn fragment_shader() -> bevy::shader::ShaderRef {
        SHADER_ASSET_PATH.into()
    }

    fn deferred_fragment_shader() -> bevy::shader::ShaderRef {
        SHADER_ASSET_PATH.into()
    }
}
Post processing - Custom render pass#
Pipeline / Render pass を作成/追加する例。ポストプロセスとして、シーンの描画結果全体にエフェクトをかける。ポストプロセスは新たな Pipeline / Render pass として追加する。
メインの描画処理後、その結果のテクスチャに対して処理を行うため、追加する Render pass がメイン描画処理に後続する必要がある。
レンダリング処理はv0.18 までは RenderGraph によるグラフ構造により表現されていた。 Node を新たに定義し、これを RenderGraph の適切な位置に挿入することで処理順を定義していた。
次のバージョンでは RenderGraph がECS化される。 レンダリング処理も ECS のシステムとその制約によって定義されるようになった。
Pipeline / Render pass 定義を行うには wgpu (+ bevy のレンダリング処理) の知識が必要。Bevy側については現状コードを読む必要がありそう。
例からは2つのことが読み解ける。
- レンダリング処理へのポストプロセスの追加
- Main world の
Componentからシェーダのvar<uniform>へのデータ受け渡し
レンダリング処理へのポストプロセスの追加#
毎フレームの処理:Render pass を作成してdraw#
ポストプロセスは ViewTarget の post_process_write() を使う。PostProcessWrite が返ってくる。 これの struct の source にそこまでの描画結果が入っているので、 destination へポストプロセス後の絵を書き込む。 ViewTarget はおそらく描画先の表現だが、カメラが複数ある可能性があるため、 現在の描画先を得るために ViewQuery のデータとして取得する必要があるようだ。
新たに追加する Render pass に入力として source を渡し、出力として destination を渡す。
impl ViewNode for PostProcessNode { // v0.18 では `Node` として定義
    // 略
    // 毎フレームの処理: RenderPass を作り、入出力を渡し、draw()
    fn run<'w>( /* 略 */ ) {
        // 略

        let post_process = view_target.post_process_write();

        let bind_group = render_context.render_device().create_bind_group(
            "post_process_bind_group",
            &pipeline_cache.get_bind_group_layout(&post_process_pipeline.layout),
            &BindGroupEntries::sequential((
                post_process.source,
                &post_process_pipeline.sampler,
                settings_binding.clone(),
            )),
        );

        let mut render_pass = render_context.begin_tracked_render_pass(RenderPassDescriptor {
            label: Some("post_process_pass"),
            color_attachments: &[Some(RenderPassColorAttachment {
                view: post_process.destination,
                depth_slice: None,
                resolve_target: None,
                ops: Operations::default(),
            })],
            depth_stencil_attachment: None,
            timestamp_writes: None,
            occlusion_query_set: None,
        });

        render_pass.set_render_pipeline(pipeline);
        render_pass.set_bind_group(0, &bind_group, &[setting_index.index()]);
        render_pass.draw(0..3, 0..1);
    }
}
セットアップ処理: Pipelineの定義#
Pipeline は事前に定義し、キャッシュしておく。
例では vertex は FullscreenShader のものを使いまわし、 fragment のみを定義している。
// セットアップの処理にて Pipeline を定義
fn init_post_process_pipeline(
    mut commands: Commands,
    render_device: Res<RenderDevice>,
    asset_server: Res<AssetServer>,
    fullscreen_shader: Res<FullscreenShader>,
    pipeline_cache: Res<PipelineCache>,
) {
    let layout = BindGroupLayoutDescriptor::new(
        "post_process_bind_group_layout",
        &BindGroupLayoutEntries::sequential(
            ShaderStages::FRAGMENT,
            (
                texture_2d(TextureSampleType::Float { filterable: true }),
                sampler(SamplerBindingType::Filtering),
                uniform_buffer::<PostProcessSettings>(true),
            ),
        ),
    );

    let sampler = render_device.create_sampler(&SamplerDescriptor::default());
    let shader = asset_server.load(SHADER_ASSET_PATH);
    let vertex_state = fullscreen_shader.to_vertex_state();
    let pipeline_id = pipeline_cache.queue_render_pipeline(RenderPipelineDescriptor {
        label: Some("post_process_pipeline".into()),
        layout: vec![layout.clone()],
        vertex: vertex_state,
        fragment: Some(FragmentState {
            shader,
            targets: vec![Some(ColorTargetState {
                format: TextureFormat::bevy_default(),
                blend: None,
                write_mask: ColorWrites::ALL,
            })],
            ..Default::default()
        }),
        ..Default::default()
    });
    commands.insert_resource(PostProcessPipeline {
        layout,
        sampler,
        pipeline_id,
    });
}
シェーダ#
Fragmentシェーダは FullscreenShader の Vertexシェーダの結果: FullscreenVertexOutput と 設定を詰め込んだUniform や入力のテクスチャを受け取り、エフェクトを実現している。
#import bevy_core_pipeline::fullscreen_vertex_shader::FullscreenVertexOutput

@group(0) @binding(0) var screen_texture: texture_2d<f32>;
@group(0) @binding(1) var texture_sampler: sampler;
struct PostProcessSettings {
    intensity: f32,
#ifdef SIXTEEN_BYTE_ALIGNMENT
    _webgl2_padding: vec3<f32>
#endif
}

@group(0) @binding(2) var<uniform> settings: PostProcessSettings;

@fragment
fn fragment(in: FullscreenVertexOutput) -> @location(0) vec4<f32> {
    let offset_strength = settings.intensity;

    return vec4<f32>(
        textureSample(screen_texture, texture_sampler, in.uv + vec2<f32>(offset_strength, - offset_strength)).r,
        textureSample(screen_texture, texture_sampler, in.uv + vec2<f32>(-offset_strength, 0.0)).g,
        textureSample(screen_texture, texture_sampler, in.uv + vec2<f32>(0.0, offset_strength)).b,
        1.0
    );
}
Main world の Component からシェーダの var<uniform> へのデータ受け渡し#
Main world の C: Component + ShaderType をシェーダに var<uniform> として渡す。
シェーダは Render world からアクセスすることになるため、まずは Main world → Render world へのデータ転送が必要となる。 Render world から シェーダへは wgpu (+ bevy の層) を通して シェーダ へデータ定義/受け渡しを行う。
例ではカメラにポストエフェクトの設定値: PostProcessSettings を貼りつけ、
この値をシェーダで受け取っている。
Main world 側のデータ: Component 定義
#[derive(Component, Default, Clone, Copy, ExtractComponent, ShaderType)]
struct PostProcessSettings {
    intensity: f32,
    #[cfg(feature = "webgl2")]
    _webgl2_padding: Vec3,
}
シェーダ側のデータ: var<uniform> 定義
struct PostProcessSettings {
    intensity: f32,
#ifdef SIXTEEN_BYTE_ALIGNMENT
    _webgl2_padding: vec3<f32>
#endif
}
@group(0) @binding(2) var<uniform> settings: PostProcessSettings;
Main world → Render world の Component 受け渡し+Uniform化をプラグインにて設定
ExtractComponentPlugin<PostProcessSettings>とUniformComponentPlugin<PostProcessSettings>をadd_plugins:ExtractComponentPluginは Main world のComponentを Render world の Entity へ展開する。UniformComponentPluginはComponentUniformsリソースを作成し、 Entity にDynamicUniformIndexを付加する。 dynamic offsets を使う前提であることに注意。
        app.add_plugins((
            ExtractComponentPlugin::<PostProcessSettings>::default(),
            UniformComponentPlugin::<PostProcessSettings>::default(),
        ));
レンダリング実行前のPipeline へのBindGroupレイアウト定義
    let layout = BindGroupLayoutDescriptor::new(
        "post_process_bind_group_layout",
        &BindGroupLayoutEntries::sequential(
            ShaderStages::FRAGMENT,
            (
                texture_2d(TextureSampleType::Float { filterable: true }),
                sampler(SamplerBindingType::Filtering),
                uniform_buffer::<PostProcessSettings>(true),
            ),
        ),
    );
レンダリング実行時の Component データ受け取り
- Render world の Entity に
ComponentとDynamicUniformIndexが付加されている - Uniform buffer は リソース
ComponentUniformsであり、前述の通り dynamic offsets を持つ Uniform buffer である
    // ViewQuery にて
    type ViewQuery = (
        &'static ViewTarget,
        &'static PostProcessSettings,
        &'static DynamicUniformIndex<PostProcessSettings>,
    );

    fn run<'w>(
        // 略
        (view_target, _, setting_index): bevy::ecs::query::QueryItem<'w, '_, Self::ViewQuery>,
    ) -> /* ... */ {

        let settings_uniforms = world.resource::<ComponentUniforms<PostProcessSettings>>();
        let Some(settings_binding) = settings_uniforms.uniforms().binding() else {
            return Ok(());
        };
        // 略
    }
レンダリング実行時の BindGroup へのデータ受け渡し
- dynamic offsets の指定が必要
        let bind_group = render_context.render_device().create_bind_group(
            "post_process_bind_group",
            &pipeline_cache.get_bind_group_layout(&post_process_pipeline.layout),
            &BindGroupEntries::sequential((
                post_process.source,
                &post_process_pipeline.sampler,
                settings_binding.clone(),
            )),
        );
        // 略
        render_pass.set_bind_group(0, &bind_group, &[setting_index.index()]);
その他#
RenderApp : レンダリングのsub-app。 App から取得可能。
Custom phase item (未解読)#
現状あまり理解できてない。 Bevyビルドインのレンダリング処理の一部を再利用しながら、レンダリングをカスタムする手段…らしい。"Bevyビルドインのレンダリング処理" とその構造を理解していることが前提のようだ。
まず "render phase" と "render phase item" が何を意味しているか理解することが必要そう…
先に Custom render phase を理解したほうが早いかも?
サンプルコードを理解しようとする軌跡のメモ#
bevy::render_phase の説明に "render phase" に関する言及あり#
The modular rendering abstraction responsible for queuing, preparing, sorting and drawing entities as part of separate render phases.
In Bevy each view (camera, or shadow-casting light, etc.) has one or multiple render phases (e.g. opaque, transparent, shadow, etc). They are used to queue entities for rendering. Multiple phases might be required due to different sorting/batching behaviors (e.g. opaque: front to back, transparent: back to front) or because one phase depends on the rendered texture of the previous phase (e.g. for screen-space reflections).
Bevy の view : カメラや射影するライトなど、は複数の "render phase" を持つ。 レンダリング対象のEntityをキューイングするために使われる。 複数の "render phase" が必要となる理由は以下通り:
- ソートやバッチのふるまいに違いがあること: 例えば透過オブジェクトと不透明オブジェクトではソート順の制約が異なる
- "render phase" 間に順序制約があること: ある "render phase" が別の "render phase" の結果を参照する
To draw an entity, a corresponding
PhaseItemhas to be added to one or multiple of these render phases for each view that it is visible in. This must be done in theRenderSystems::Queue. After that the render phase sorts them in theRenderSystems::PhaseSort. Finally the items are rendered using a singleTrackedRenderPass, during theRenderSystems::Render.
あるEntityを描画するには、対応するPhaseItemが、それをvisibleとするview毎に、1つ以上の"render phase" に追加されている必要がある。これはRenderSystems::Queueの間に行われる必要がある。その後RenderSystems::PhaseSortにて、 "render phase" はそれらをソートする。最終的に RenderSystems::Render にて、 TrackedRenderPassを使って "items" ( PhaseItem をさすと思われる
: render world の entity) はレンダリングされる。
Therefore each phase item is assigned a
Drawfunction. These set up the state of theTrackedRenderPass(i.e. select theRenderPipeline, configure theBindGroups, etc.) and then issue a draw call, for the corresponding item.
各"phase item" にはDraw関数が割り当てられる。この関数は TrackedRenderPass の state をセットアップし(例えば、RenderPipelineを選択する, BindGroups を設定する、など)、その後 "draw call" を発行する。
→ Post processing - Custom render pass における、下記のあたりの処理に相当する部分という認識。Post processing は描画対象のEntityを持たない(FullscreenShaderなので特殊)のでそのあたりの差(VertexBuffer等の設定?)があるはず。
        let bind_group = render_context.render_device().create_bind_group(
            "post_process_bind_group",
            &pipeline_cache.get_bind_group_layout(&post_process_pipeline.layout),
            &BindGroupEntries::sequential((
                post_process.source,
                &post_process_pipeline.sampler,
                settings_binding.clone(),
            )),
        );

        let mut render_pass = render_context.begin_tracked_render_pass(RenderPassDescriptor {
            label: Some("post_process_pass"),
            color_attachments: &[Some(RenderPassColorAttachment {
                view: post_process.destination,
                depth_slice: None,
                resolve_target: None,
                ops: Operations::default(),
            })],
            depth_stencil_attachment: None,
            timestamp_writes: None,
            occlusion_query_set: None,
        });

        render_pass.set_render_pipeline(pipeline);
        render_pass.set_bind_group(0, &bind_group, &[setting_index.index()]);
        render_pass.draw(0..3, 0..1);
PhaseItem とそのバリエーション#
また説明に重複はあるが、PhaseItem の説明もサンプルコードを理解するために必要そうである。
RenderCommand<P: PhaseItem>#
RenderCommands are modular standardized pieces of render logic that can be composed intoDrawfunctions.To turn a stateless render command into a usable draw function it has to be wrapped by a
RenderCommandState. This is done automatically when registering a render command as aDrawfunction via theAddRenderCommand::add_render_commandmethod.Compared to the draw function the required ECS data is fetched automatically (by the
RenderCommandState) from the render world. Therefore the three typesParam,ViewQueryandItemQueryare used. They specify which information is required to execute the render command.Multiple render commands can be combined together by wrapping them in a tuple.
RenderCommand はモジュール化・標準化されたレンダリングロジックの部品であり、 Draw 関数に組み込み可能なもの。
ステートレスなコマンドを利用可能なdraw関数へ変換するために、コマンドはRenderCommandState にラップされる必要がある。これはAddRenderCommand::add_render_commandによりコマンドがDraw関数として登録される際、自動的に行われる。
draw関数と比して、必要なECSデータは(RenderCommandStateにより)render worldから自動的に取得される。よって、 Param と ViewQuery、 ItemQuery が使われる。これらがコマンド実行に必要な情報を指定する。
複数のコマンドはタプルにして一つにまとめることができる。
タプルにてまとまられたコマンドとしてbevy_pbr::DrawMaterial が例示されている
Custom render phase#
memo#
PhaseItem#
Render worldにおけるエンティティであり、Render phaseの一部として スクリーンテクスチャに描画されるものを示すtrait。
ExtractScheduleにて、あるエンティティのレンダリングに必要なデータはMain worldから展開される。
そして、RenderSystems::Queue中に対応するRender phaseへキューイングされる。
その後、必要に応じてRenderSystems::PhaseSort中にソーティングされ、RenderSystems::Renderにてレンダリングされる。
PhaseItemにはフレーバーが2つある
BinnedPhaseItem:BinKeyを持つ、ビン詰されたPhase item。同じビンの中のすべてのPhase itemは一緒にバッチ処理することが可能なモノである。BinKey間はソートされるが、ビン内のPhase itemはソートされない。BinnedPhaseItemは、レンダリング順が重要でない、不透明メッシュのレンダリングなどによい。通常、BinnedPhaseItemはSortedPhaseItemより速度に勝る。SortedPhaseItem: 大きな1つのバッファに置かれ、その中でソーティングされる前提のPhase item。画家のアルゴリズムにて、奥から手前に順にレンダリングが必要となる、透明メッシュのレンダリングに必要となる。速度はBinnedPhaseItemに劣る。
CachedRenderPipelinePhaseItem と SpecializedMeshPipeline(`SpecializedMeshPipelines)#
CachedRenderPipelinePhaseItem はPhaseItemのうち、PipelineCacheから適切なRenderPipelineをセットするもの。
これをimplするとRenderCommand<P>のSetItemPipelineを使い、キャッシュしたパイプラインをセットできる。
SpecializedMeshPipelineは、キー情報(Self::Key)とVertexバッファレイアウト(実際にはポインタらしいMeshVertexBufferLayoutRef)から一意に構築可能なRenderPipelineを示すtrait。
キー情報とバッファレイアウトから一意に構築可能であることにより、それらをキーとしてキャッシュ可能である。
Resource SpecializedMeshPipelinesがそのキャッシュを保持する。
SpecializedMeshPipelines::specialize()によりRenderPipelineを構築orキャッシュから取得できる。
サンプルを見ると、PhaseItemのStencil3dのキューイング時にPipelineを取得(or構築)し、Stencil3dへそのIDを保持している。
Stencil3dはCachedRenderPipelinePhaseItem::cached_pipeline()にてこのIDを返す。
fn queue_custom_meshes(
    custom_draw_functions: Res<DrawFunctions<Stencil3d>>,
    mut pipelines: ResMut<SpecializedMeshPipelines<StencilPipeline>>,
    pipeline_cache: Res<PipelineCache>,
    custom_draw_pipeline: Res<StencilPipeline>,
    render_meshes: Res<RenderAssets<RenderMesh>>,
    render_mesh_instances: Res<RenderMeshInstances>,
    mut custom_render_phases: ResMut<ViewSortedRenderPhases<Stencil3d>>,
    mut views: Query<(&ExtractedView, &RenderVisibleEntities, &Msaa)>,
    has_marker: Query<(), With<DrawStencil>>,
) {
    for (view, visible_entities, msaa) in &mut views {
        let Some(custom_phase) = custom_render_phases.get_mut(&view.retained_view_entity) else {
            continue;
        };
        let draw_custom = custom_draw_functions.read().id::<DrawMesh3dStencil>();

        let view_key = MeshPipelineKey::from_msaa_samples(msaa.samples())
            | MeshPipelineKey::from_hdr(view.hdr);
        let rangefinder = view.rangefinder3d();

        for (render_entity, visible_entity) in visible_entities.iter::<Mesh3d>() {
            if has_marker.get(*render_entity).is_err() {
                continue;
            }
            let Some(mesh_instance) = render_mesh_instances.render_mesh_queue_data(*visible_entity)
            else {
                continue;
            };
            let Some(mesh) = render_meshes.get(mesh_instance.mesh_asset_id) else {
                continue;
            };

            let mut mesh_key = view_key;
            mesh_key |= MeshPipelineKey::from_primitive_topology(mesh.primitive_topology());

            let pipeline_id = pipelines.specialize(
                &pipeline_cache,
                &custom_draw_pipeline,
                mesh_key,
                &mesh.layout,
            );
            let pipeline_id = match pipeline_id {
                Ok(id) => id,
                Err(e) => {
                    error!("Failed to specialize pipeline: {e}");
                    continue;
                }
            };
            let distance = rangefinder.distance(&mesh_instance.center);

            custom_phase.add(Stencil3d {
                sort_key: FloatOrd(distance),
                entity: (*render_entity, *visible_entity),
                pipeline: pipeline_id,
                draw_function: draw_custom,
                batch_range: 0..1, // not batched
                extra_index: PhaseItemExtraIndex::None,
                indexed: mesh.indexed(),
            });
        }
    }
}
// specializeにてPipeline定義を記述。上記の `pipelines.specialize()` にてキャッシュヒットしなければ構築に使われる。
impl SpecializedMeshPipeline for StencilPipeline {
    type Key = MeshPipelineKey;

    fn specialize(
        &self,
        key: Self::Key,
        layout: &bevy::mesh::MeshVertexBufferLayoutRef,
    ) -> Result<RenderPipelineDescriptor, SpecializedMeshPipelineError> {
        let mut vertex_attributes = Vec::new();
        if layout.0.contains(Mesh::ATTRIBUTE_POSITION) {
            vertex_attributes.push(Mesh::ATTRIBUTE_POSITION.at_shader_location(0));
        }

        let vertex_buffer_layout = layout.0.get_layout(&vertex_attributes)?;
        let view_layout = self
            .mesh_pipeline
            .get_view_layout(MeshPipelineViewLayoutKey::from(key));

        Ok(RenderPipelineDescriptor {
            label: Some("Specialized Mesh Pipeline".into()),
            layout: vec![
                view_layout.main_layout.clone(),
                view_layout.empty_layout.clone(),
                self.mesh_pipeline.mesh_layouts.model_only.clone(),
            ],
            vertex: VertexState {
                shader: self.shader_handle.clone(),
                buffers: vec![vertex_buffer_layout],
                ..default()
            },
            // 略...
        })
    }
}

//...
impl CachedRenderPipelinePhaseItem for Stencil3d {
    #[inline]
    fn cached_pipeline(&self) -> CachedRenderPipelineId {
        self.pipeline
    }
}
// ...
type DrawMesh3dStencil = (
    SetItemPipeline,
    SetMeshViewBindGroup<0>,
    SetMeshViewEmptyBindGroup<1>,
    SetMeshBindGroup<2>,
    DrawMesh,
);

// ...
impl Plugin for MeshStencilPhasePlugin {
    fn build(&self, app: &mut App) {
        //略...
        render_app
            .init_resource::<SpecializedMeshPipelines<StencilPipeline>>()
            .init_resource::<DrawFunctions<Stencil3d>>()
            .add_render_command::<Stencil3d, DrawMesh3dStencil>()
        //略...
    }
}
あちこちに出てくる MainEntity#
Main world から Render world に展開されたエンティティの追跡用コンポーネント。
Entity を保持している。
よく (Entity, MainEntity) のように現れる。1つめがRender worldの Entity、2つめがそれに対応するMain worldのEntityを追跡するMainEntityということと思われる。
GetBatchData GetFullBatchData と batch_and_prepare_sorted_render_phase#
この3つは削除してもサンプルが動作する。 PhaseItemをバッチ処理するためにまとめようとするシステムである、らしい。 おそらくシステムを実行しない場合、各Itemは個別にDrawされることになると思われる。
サンプルのコードはItemを1つだけ描画するため、恩恵に与れない。
自作PhaseItemを大量描画するコードを書き、パフォーマンスを測定可能な状態を作って初めて価値を感じられる部分と思われる。
GetBatchData と GetFullBatchData の中身を気にするのはそれからでよさそう…
なお、システム batch_and_prepare_sorted_render_phase() は GetBatchData または GetFullBatchData を要求する。
batch_and_prepare_sorted_render_phase() は gpu_preprocessing のものと no_gpu_preprocessing のものがある。
gpu_preprocessing::batch_and_prepare_sorted_render_phase<BPI, GFBD>no_gpu_preprocessing::batch_and_prepare_sorted_render_phase<I, GBD>
これらのBinnedPhaseItem版もある。
またほかにも GetFullBatchData等を型パラメタに要求するシステムがあるようだ。
よりパフォーマンスを求める実装を行う際には、このあたりの仕組みを理解する必要はあるのかも。
ex-2: ほかのオブジェクトに遮蔽された部分を透視するエフェクト#
https://github.com/ashiojin/learn-shader/tree/main/ex-2-custom-render-phase
サンプルのコードはCubeのメッシュをOpaque3dと追加したStencil3dの2回描画している。
Stencil3dはOpaque3dよりも後のノードとして実行されており、
また深度バッファを使用せず、 かつメッシュを赤一色で表示している。
結果としてメッシュの前後関係等を無視して赤いCube描画されている。
この赤いCubeに隠されているが、実は元のメッシュも描画されている。
サンプルを起動すると、カスタムのシェーダ読み込み中、元のメッシュが見える。
Exerciseとして、アクションゲームでよく見る「ほかのオブジェクトに遮蔽された部分を透視するエフェクト」を実装する。
Opaque3dに遮蔽されている部分 のみ に重畳表示を行う。
深度バッファにはOpaque3dの結果が書き込まれているため、
深度テストの条件をLess:遮蔽されている場合のみとすればよい(自身もOpaque3dなので等値は含めない)。
サンプルのコードを以下変更した:
- カスタムのRenderPhaseについて
Viewに紐づいた深度テクスチャをRenderPassへアタッチ- 深度テストを
Lessにし、遮蔽された部分のみ描画するようPipelineを設定
- 効果をわかりやすくするため、フラグメントシェーダを半透明のチェッカー柄描画に変更
- そのほか:ほかのオブジェクトを配置+カメラを回転
結果:
impl ViewNode for CustomDrawNode {
    type ViewQuery = (
        &'static ExtractedCamera,
        &'static ExtractedView,
        &'static ViewTarget,
        Option<&'static MainPassResolutionOverride>,
        Read<ViewDepthTexture>, // View に紐づいているDepthTexture
    );

    fn run<'w>(
        &self,
        graph: &mut RenderGraphContext,
        render_context: &mut RenderContext<'w>,
        (camera, view, target, resolution_override, depth_texture): QueryItem< 'w, '_, Self::ViewQuery, >,
        world: &'w World,
    ) -> Result<(), NodeRunError> {
        // ... 略

        let mut render_pass = render_context.begin_tracked_render_pass(RenderPassDescriptor {
            label: Some("stencil pass"),
            color_attachments: &[Some(target.get_color_attachment())],
            depth_stencil_attachment: Some(depth_texture.get_attachment(StoreOp::Store)), // Viewに紐づいている深度テクスチャをアタッチ
            timestamp_writes: None,
            occlusion_query_set: None,
        });

        // ... 略
    }
}
impl SpecializedMeshPipeline for StencilPipeline { // サンプルのままの名前(リネームをさぼっている)
        // ... 略 ...
    fn specialize(
        &self,
        key: Self::Key,
        layout: &bevy::mesh::MeshVertexBufferLayoutRef,
    ) -> Result<RenderPipelineDescriptor, SpecializedMeshPipelineError> {
        // ... 略 ...

        Ok(RenderPipelineDescriptor {
            // ... 略 ...
            fragment: Some(FragmentState {
                shader: self.shader_handle.clone(),
                targets: vec![Some(ColorTargetState {
                    format: TextureFormat::bevy_default(),
                    blend: Some(BlendState::ALPHA_BLENDING), // 半透明の影を描きたかったのでALPHA_BLENDING
                    write_mask: ColorWrites::ALL,
                })],
                ..default()
            }),

            // Opaque3dにて描かれたオブジェクトに隠れている場合のみ描く。
            // Opaque3dにて同じエンティティのメッシュがすでにレンダリング済みなので、
            // `Less` である必要がある。
            depth_stencil: Some(DepthStencilState {
                format: CORE_3D_DEPTH_FORMAT, // Core3dのDepthテクスチャフォーマット
                depth_write_enabled: false,
                depth_compare: CompareFunction::Less,
                stencil: StencilState::default(),
                bias: DepthBiasState::default()
            }),
            ..default()
        })
    }
}
// せっかくなのでワールド座標ベースのチェッカー柄を描画
@fragment
fn fragment(in: VertexOutput) -> @location(0) vec4<f32> {
    let f = 30.0;
    let alpha = 0.1;
    let checkerboard = step(0.0,
        sin(in.world_position.x * f) * sin(in.world_position.y * f) * sin(in.world_position.z * f)
    );
    return vec4(1.0, 1.0, 1.0, alpha * checkerboard);
}
ex-3: ex-2に加え、透視部分にてステンシルバッファを使う輪郭線を描く#
透視部分のレンダリングに2パス使う。
- 1パス目: メッシュを少し縮小して、ステンシルバッファにマスクを書き込み
- 縮小すると同オブジェクトの通常描画の後ろに回ることになるが問題ない? 書き込み対象外部分のマスクのためなので深度テストなしでマスク描いていいはず
- 2パス目: 深度テストLessにて単色書き込み
- マスクされて輪郭部分のみ書き込まれる想定
PhaseItemを2つに分ける?RenderCommandにて2パス描けばよさそう。
SetItemPipeline は1つのPhaseItemが複数のPipelineを必要とする場合にはつかえない。
CachedRenderPipelinePhaseItem::cached_pipeline()にて返されるPipelineをセットするだけなので。
SetMeshViewBindGroup ~ DrawMeshは使えそう。Setxxx系は1度だけ呼べばいけそう。
bevyの中身もいじってステンシルバッファを使ってみる#
オブジェクトの縮小を使ったなんちゃって輪郭描画。 複雑な形のオブジェクトだと残念なことになるはず。 ex-2の続きとしておこなったので輪郭描画は遮蔽部分だけ適用。
CORE_3D_DEPTH_FORMATをステンシルバッファに対応するものに差し替え。
pub const CORE_3D_DEPTH_FORMAT: TextureFormat = TextureFormat::Depth32FloatStencil8;
src/main.rsのトピック:
- PhaseItem にマスクを描く
MaskPipelineを追加StencilPipelineと同じメッシュに対し、マスクをステンシルバッファに書き込む- マスクはオブジェクトをVertexシェーダで縮小したもの
GetBatchDataあたりは不要かもしれない?未調査★
- 元の
StencilPipelineを変更しステンシルテスト追加- 輪郭を描くため、Fragmentシェーダは単色を返すように変更
- PhaseItem の RenderCommand に
MaskPipeline関連の処理を追加 MaskPipeline追加のためのリソース、システム追加- ただしシステムの追加は本当に必要か検証してない★
- PhaseItem キューイング時に
MaskPipelineを追加 - RenderPass の作成時、DepthStencilAttachment を設定するが、bevyがステンシルバッファ機能を固定で無効化するため、有効にするよう設定上書き
// ステンシルバッファの1bitをマスクの値とする。書き込んであればマスクされている
const STENCIL_VALUE_MASKED: u32 = 0x01;
// マスクをステンシルバッファにセットするためのパイプライン
#[derive(Resource)]
struct MaskPipeline {
    mesh_pipeline: MeshPipeline,
    shader_handle: Handle<Shader>,
}

impl SpecializedMeshPipeline for MaskPipeline {
    type Key = MeshPipelineKey;

    fn specialize(
        &self,
        key: Self::Key,
        layout: &bevy::mesh::MeshVertexBufferLayoutRef,
    ) -> Result<RenderPipelineDescriptor, SpecializedMeshPipelineError> {
        let mut vertex_attributes = Vec::new();
        if layout.0.contains(Mesh::ATTRIBUTE_POSITION) {
            vertex_attributes.push(Mesh::ATTRIBUTE_POSITION.at_shader_location(0));
        }

        let vertex_buffer_layout = layout.0.get_layout(&vertex_attributes)?;
        let view_layout = self
            .mesh_pipeline
            .get_view_layout(MeshPipelineViewLayoutKey::from(key));

        Ok(RenderPipelineDescriptor {
            label: Some("Specialized Mesh Pipeline(Mask)".into()),
            // …略 SpecializedMeshPipeline の実装をコピペし、
            //   シェーダはマスクを描くためのものに置き換え

            // ステンシルバッファを設定
            // Only render if it's overlapped by others
            depth_stencil: Some(DepthStencilState {
                format: CORE_3D_DEPTH_FORMAT,
                depth_write_enabled: false,
                depth_compare: CompareFunction::Less, // Depthテストは不要かも。小さくして描くので基本的に元のオブジェクトに埋没する
                stencil: StencilState {
                    front: StencilFaceState {
                        compare: CompareFunction::Always, // ステンシルテストは不要
                        pass_op: StencilOperation::Replace, // パスしたらフラグを立てる
                        fail_op: StencilOperation::Keep,
                        depth_fail_op: StencilOperation::Keep,
                    },
                    back: StencilFaceState::IGNORE,
                    read_mask: STENCIL_VALUE_MASKED,
                    write_mask: STENCIL_VALUE_MASKED,
                },
                bias: DepthBiasState::default()
            }),
            ..default()
        })
    }
}

// `GetBatchData` と `GetFullBatchData` は実装しない
// `GetFullBatchData` は

// 遮蔽している部分を描くパイプライン
// ex-2と動作は同じだが、ステンシルバッファのマスクを避ける→輪郭だけ描画する
impl SpecializedMeshPipeline for StencilPipeline {
    type Key = MeshPipelineKey;

    fn specialize(
        &self,
        key: Self::Key,
        layout: &bevy::mesh::MeshVertexBufferLayoutRef,
    ) -> Result<RenderPipelineDescriptor, SpecializedMeshPipelineError> {
        let mut vertex_attributes = Vec::new();
        if layout.0.contains(Mesh::ATTRIBUTE_POSITION) {
            vertex_attributes.push(Mesh::ATTRIBUTE_POSITION.at_shader_location(0));
        }

        let vertex_buffer_layout = layout.0.get_layout(&vertex_attributes)?;
        let view_layout = self
            .mesh_pipeline
            .get_view_layout(MeshPipelineViewLayoutKey::from(key));

        Ok(RenderPipelineDescriptor {
            label: Some("Specialized Mesh Pipeline".into()),

            // ...略

            // Only render if it's overlapped by others
            depth_stencil: Some(DepthStencilState {
                format: CORE_3D_DEPTH_FORMAT,
                depth_write_enabled: false,
                depth_compare: CompareFunction::Less,
                stencil: StencilState {
                    front: StencilFaceState {
                        compare: CompareFunction::NotEqual, // ステンシルテスト!マスクされていなければ描画する
                        pass_op: StencilOperation::Keep,
                        fail_op: StencilOperation::Keep,
                        depth_fail_op: StencilOperation::Keep,
                    },
                    back: StencilFaceState::IGNORE,
                    read_mask: STENCIL_VALUE_MASKED,
                    write_mask: STENCIL_VALUE_MASKED,
                },
                bias: DepthBiasState::default()
            }),
            ..default()
        })
    }
}

// マスクをステンシルバッファにセットするためのパイプラインをセットするRenderCommand
pub struct SetMaskPipeline;
impl<P: CachedMaskPipelinePhaseItem> RenderCommand<P> for SetMaskPipeline {
    type Param = SRes<PipelineCache>;
    type ViewQuery = ();
    type ItemQuery = ();
    #[inline]
    fn render<'w>(
        item: &P,
        _view: (),
        _entity: Option<()>,
        pipeline_cache: SystemParamItem<'w, '_, Self::Param>,
        pass: &mut TrackedRenderPass<'w>,
    ) -> RenderCommandResult {
        if let Some(pipeline) = pipeline_cache
            .into_inner()
            .get_render_pipeline(item.cached_mask_pipeline())
        {
            pass.set_render_pipeline(pipeline);
            RenderCommandResult::Success
        } else {
            RenderCommandResult::Skip
        }
    }
}

// `SetMaskPipeline` を `PhaseItem` にて使えるようにするためのtrait
trait CachedMaskPipelinePhaseItem: PhaseItem {
    fn cached_mask_pipeline(&self) -> CachedRenderPipelineId;
}
// PhaseItem へ実装
impl CachedMaskPipelinePhaseItem for Stencil3d {
    #[inline]
    fn cached_mask_pipeline(&self) -> CachedRenderPipelineId {
        self.mask_pipeline
    }
}

type DrawMesh3dStencil = (
    // マスクを描くためのset_pipeline ~ draw
    SetMaskPipeline, //
    SetMeshViewBindGroup<0>,
    SetMeshViewEmptyBindGroup<1>,
    SetMeshBindGroup<2>,
    SetStencilValue<STENCIL_VALUE_MASKED>, // `pass.set_stencil_reference(I)` するだけのRenderCommandを自作
    DrawMesh,

    // 遮蔽部分全体を描くdraw(マスクされるので輪郭のみ残る)
    SetItemPipeline,
    // SetMeshViewBindGroup<0>, // すでにセットされている
    // SetMeshViewEmptyBindGroup<1>,
    // SetMeshBindGroup<2>,
    DrawMesh,
);

// PhaseItem キューイング時に両パイプラインをPhaseItemに設定
#[allow(clippy::too_many_arguments)]
fn queue_custom_meshes(
    custom_draw_functions: Res<DrawFunctions<Stencil3d>>,
    mut pipelines: ResMut<SpecializedMeshPipelines<StencilPipeline>>,
    mut mask_pipelines: ResMut<SpecializedMeshPipelines<MaskPipeline>>,
    pipeline_cache: Res<PipelineCache>,
    custom_draw_pipeline: Res<StencilPipeline>,
    custom_draw_mask_pipeline: Res<MaskPipeline>,
    render_meshes: Res<RenderAssets<RenderMesh>>,
    render_mesh_instances: Res<RenderMeshInstances>,
    mut custom_render_phases: ResMut<ViewSortedRenderPhases<Stencil3d>>,
    mut views: Query<(&ExtractedView, &RenderVisibleEntities, &Msaa)>,
    has_marker: Query<(), With<DrawStencil>>,
) {

    for (view, visible_entities, msaa) in &mut views {
        // ...略

        for (render_entity, visible_entity) in visible_entities.iter::<Mesh3d>() {
        // ...略

            // `StencilPipeline` をspecialize&cache
            let pipeline_id = pipelines.specialize(
                &pipeline_cache,
                &custom_draw_pipeline,
                mesh_key,
                &mesh.layout,
            );
            let pipeline_id = match pipeline_id {
                Ok(id) => id,
                Err(e) => {
                    error!("Failed to specialize pipeline: {e}");
                    continue;
                }
            };

            // 新たに作成した `MaskPipeline` をspecialize&cache
            let mask_pipeline_id = mask_pipelines.specialize(
                &pipeline_cache,
                &custom_draw_mask_pipeline,
                mesh_key,
                &mesh.layout,
            );
            let mask_pipeline_id = match mask_pipeline_id {
                Ok(id) => id,
                Err(e) => {
                    error!("Failed to specialize pipeline: {e}");
                    continue;
                }
            };
            // ...略

            custom_phase.add(Stencil3d {
                // ...略
                pipeline: pipeline_id,
                // ...略
                mask_pipeline: mask_pipeline_id, // 追加
            });
        }
    }
}

// `run` 時、DepthStencilAttachment にステンシルバッファ有効化が必要
#[derive(Default)]
struct CustomDrawNode;
impl ViewNode for CustomDrawNode {
    type ViewQuery = (
        &'static ExtractedCamera,
        &'static ExtractedView,
        &'static ViewTarget,
        Option<&'static MainPassResolutionOverride>,
        Read<ViewDepthTexture>,
    );

    fn run<'w>(
        &self,
        graph: &mut RenderGraphContext,
        render_context: &mut RenderContext<'w>,
        (camera, view, target, resolution_override, depth_texture): QueryItem<
            'w,
            '_,
            Self::ViewQuery,
        >,
        world: &'w World,
    ) -> Result<(), NodeRunError> {
        // ...略

        let mut depth_stencil_attachment = depth_texture.get_attachment(StoreOp::Store);
        // WORKAROUND: `get_attachment()` はステンシルバッファ側が無効(None)なので、書き換えて有効化
        // see: https://github.com/bevyengine/bevy/blob/f7c4e2d5c83a0ae2e2e3b3e03ea27e94ec95797e/crates/bevy_render/src/texture/texture_attachment.rs#L124
        depth_stencil_attachment.stencil_ops = Some(Operations {
            load: LoadOp::Clear(0),
            store: StoreOp::Store,
        });

        let mut render_pass = render_context.begin_tracked_render_pass(RenderPassDescriptor {
            label: Some("stencil pass"),
            color_attachments: &[Some(target.get_color_attachment())],
            depth_stencil_attachment: Some(depth_stencil_attachment),
            timestamp_writes: None,
            occlusion_query_set: None,
        });

        // ...略
    }
}

// 新規パイプライン関連のリソースとシステム追加… `GetBatchData` 等と同様、要否未調査
impl Plugin for MeshStencilPhasePlugin {
    fn build(&self, app: &mut App) {
        // ...略
        render_app
            .init_resource::<SpecializedMeshPipelines<StencilPipeline>>()
            .init_resource::<SpecializedMeshPipelines<MaskPipeline>>() // 追加
            .init_resource::<DrawFunctions<Stencil3d>>()
            .add_render_command::<Stencil3d, DrawMesh3dStencil>()
            .init_resource::<ViewSortedRenderPhases<Stencil3d>>()
            .add_systems(RenderStartup, init_stencil_pipeline)
            .add_systems(ExtractSchedule, extract_camera_phases)
            .add_systems(
                Render,
                (
                    queue_custom_meshes.in_set(RenderSystems::QueueMeshes),
                    sort_phase_system::<Stencil3d>.in_set(RenderSystems::PhaseSort),
                    batch_and_prepare_sorted_render_phase::<Stencil3d, StencilPipeline>
                        .in_set(RenderSystems::PrepareResources),
                    // batch_and_prepare_sorted_render_phase::<Stencil3d, MaskPipeline>
                    //     .in_set(RenderSystems::PrepareResources), // 必要なし:
                ),
            );

        // ...略
    }
}

// 追加したリソースの初期化を追加
fn init_stencil_pipeline(
    mut commands: Commands,
    mesh_pipeline: Res<MeshPipeline>,
    asset_server: Res<AssetServer>,
) {
    commands.insert_resource(StencilPipeline {
        mesh_pipeline: mesh_pipeline.clone(),
        shader_handle: asset_server.load(SHADER_ASSET_PATH),
    });
    commands.insert_resource(MaskPipeline { // 追加
        mesh_pipeline: mesh_pipeline.clone(),
        shader_handle: asset_server.load(MASK_SHADER_ASSET_PATH),
    });
}
MaskPipeline のシェーダ。Vertexシェーダでオブジェクト縮小、Fragmentシェーダはステンシルバッファ書き込みだけが目的なので透明ピクセルを出力。
// マスクをステンシルバッファにセットするためのパイプラインにて使うシェーダ
#import bevy_pbr::{
    mesh_functions,
    view_transformations::position_world_to_clip
}

struct Vertex {
    @builtin(instance_index) instance_index: u32,
    @location(0) position: vec3<f32>,
}

struct VertexOutput {
    @builtin(position) clip_position: vec4<f32>,
    @location(0) world_position: vec4<f32>,
}

// Vertex シェーダは本来のオブジェクトを縮小するようにする
@vertex
fn vertex(vertex: Vertex) -> VertexOutput {
    var out: VertexOutput;
    var world_from_local = mesh_functions::get_world_from_local(vertex.instance_index);
    // 輪郭以外をマスクしたいため、メッシュをちょっと縮小
    let scaling = 0.92;
    let scaling_matrix = mat4x4<f32>( // スケーリングだけするAffine変換
        vec4(scaling, 0.0, 0.0, 0.0),
        vec4(0.0, scaling, 0.0, 0.0),
        vec4(0.0, 0.0, scaling, 0.0),
        vec4(0.0, 0.0, 0.0, 1.0)
    );
    world_from_local = world_from_local * scaling_matrix; // 本来の変換に掛けて縮小

    out.world_position = mesh_functions::mesh_position_local_to_world(world_from_local, vec4(vertex.position, 1.0));
    out.clip_position = position_world_to_clip(out.world_position.xyz);
    return out;
}

// Fragmentシェーダはalpha=0を描画。あくまでステンシルバッファへの書き込みが目的
@fragment
fn fragment(in: VertexOutput) -> @location(0) vec4<f32> {
    return vec4(0.0, 0.0, 0.0, 0.0); // fully transparent, but will write to the stencil buffer
}
Custom vertex attribute#
Vertex シェーダの入力を拡張する。例では頂点毎に BLEND_COLOR ( vec4<f32> )を追加している。
// 追加する属性:`MeshVertexAttribute` を定義する
const ATTRIBUTE_BLEND_COLOR: MeshVertexAttribute =
    MeshVertexAttribute::new("BlendColor", 988540917, VertexFormat::Float32x4);
    // 988540917 は他の属性と衝突しない値として選ばれたランダム値


// `Mesh::with_inserted_attribute()` にて属性の値をメッシュに追加する
let mesh = Mesh::from(Cuboid::default())
    .with_inserted_attribute(
        ATTRIBUTE_BLEND_COLOR,
        vec![[1.0, 0.0, 0.0, 1.0]; 24],
    );

// Pipeline を `specialize()` し、Vertex buffer の layout に属性を乗せる
impl Material for CustomMaterial {
    fn specialize(
        _pipeline: &MaterialPipeline,
        descriptor: &mut RenderPipelineDescriptor,
        layout: &MeshVertexBufferLayoutRef,
        _key: MaterialPipelineKey<Self>,
    ) -> Result<(), SpecializedMeshPipelineError> {
        let vertex_layout = layout.0.get_layout(&[
            Mesh::ATTRIBUTE_POSITION.at_shader_location(0),
            ATTRIBUTE_BLEND_COLOR.at_shader_location(1),
        ])?;
        descriptor.vertex.buffers = vec![vertex_layout];
        Ok(())
    }

    // ...
}
struct Vertex {
    @builtin(instance_index) instance_index: u32,
    @location(0) position: vec3<f32>,
    @location(1) blend_color: vec4<f32>, // `ATTRIBUTE_BLEND_COLOR` の値が入る
};

struct VertexOutput {
    @builtin(position) clip_position: vec4<f32>,
    @location(0) blend_color: vec4<f32>,
};

@vertex
fn vertex(vertex: Vertex) -> VertexOutput {
    var out: VertexOutput;
    out.clip_position = mesh_position_local_to_clip(
        get_world_from_local(vertex.instance_index),
        vec4<f32>(vertex.position, 1.0),
    );
    out.blend_color = vertex.blend_color;
    return out;
}
Instancing#
未
Render depth to texture#
未
そのほか#
Sandbox#
書いたShaderをお試しするようのSandbox。 コード はここ。 WASM版のほか、Windows版もビルド可能。なおWindows版はUIが無く、代わりにhttpサーバとしてAPIによる操作を受け付ける。
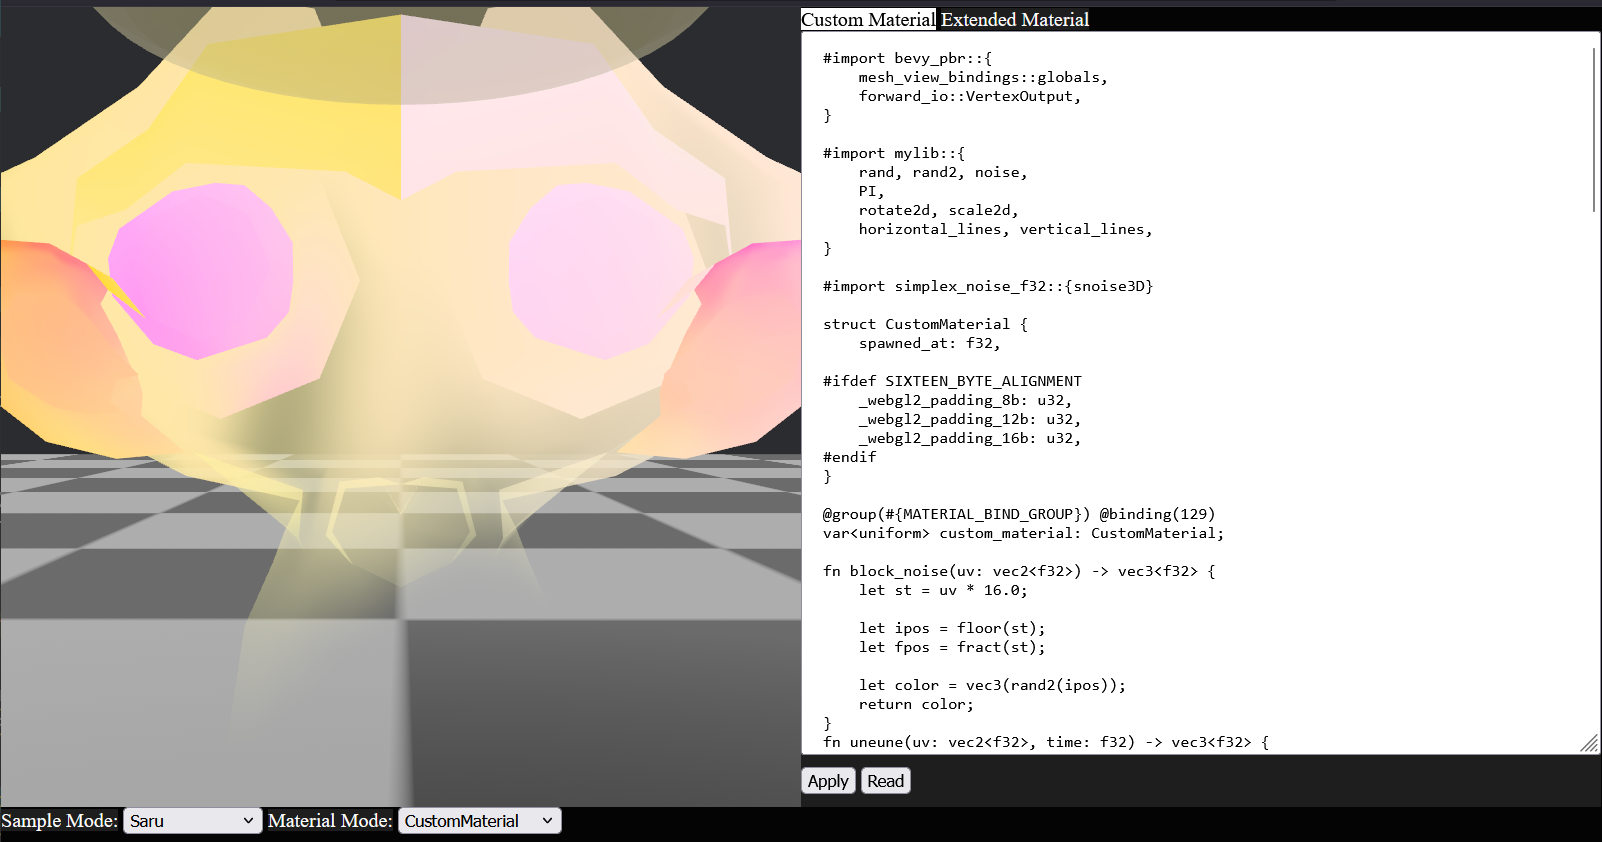
概要:
- 画面にフォーカスを当てた状態でカメラ操作(WASD + Z/X(zoom in/out))
- タブ付きのテキストエリアにてCustomMaterial(fragment shader), ExtendedMaterial(vertex/fragment shader) を読み出し/書き込み
- bevy の WGSL なのでいろいろ
#importできる- この辺も
#import可能
- この辺も
- どちらもマテリアルの中にマテリアル生成時のタイムスタンプを押してあるため、
globals.timeと差を取ることで経過時間を取れる - Apply すると反映される
- 選択しているマテリアルのモードに注意
- bevy の WGSL なのでいろいろ
- セレクトボックスにて描画対象のモデル/マテリアル変更
- モデルのうち Saru は glb から Scene を読み出し、その中のGLTF Extensionsが付加されたMaterialを置き換えている
- 後述のGLTF extensions を使ったマテリアル置換の方法を使っている
- 他は単にコードにてメッシュを作ってマテリアルを設定している
- モデルのうち Saru は glb から Scene を読み出し、その中のGLTF Extensionsが付加されたMaterialを置き換えている
未対応事項など:
- Default の Shader をちゃんとしたもの(?)にする
- 現状いろいろ試してた時の汚いコードのコピペ
- Shader含め状態のSave&Load
- マウスでのカメラ操作
- 自動動作カメラ
- ちゃんとしたUI
- とくに Editor 部分を CodeMirror とかに置き換えたい
- 操作方法の提示
- マテリアルのロードをAsyncな方法にしていないのでアプリがロード中固まる
- Windows版のビルド成果物のDeploy(API操作用のBrunoのプロジェクトとか付けとけば…)
- などなど
GLTF extras or extensions を用いた Scene 内のマテリアルのカスタムマテリアルへの置換#
マテリアルをどのようにモデルに反映するか?の方法の1つ。 ようはBlender等で作成した .gltf(.glb) に反映したい。
使えるもの:
- GLTF extras と組み合わせて特定のextrasを持つマテリアルに絞り、Scene ロードイベント にてGLTF Sceneをspawn後に置換
- GLTF extensions を使いマーカーComponentを付加、後で置換
on_spawn_mesh_and_material()のentity: EntityWorldMutはメインのWorldではなく、GLTF loader の用意する Scene構築用のWorldであるらしく、メインWorld内のリソース等にアクセスできない。なので、このタイミングでの置換は制約がある。LoadContextを通して labeled Asset をloadできるので、例のように置換自体は可能。だが、メインWorld のリソースから情報を取り出して与えるようなことは直接的にはできない(Sandbox のExtendedMaterial にはRes<Time>から取り出した生成時刻を付加していたためNG)。
Sandbox にこれらを実装した。
- extras + spawnタイミングの例は このコミット
- マテリアルへのextras追加は Blender のマテリアルへカスタムプロパティを追加することで行えた。エクスポート時、カスタムプロパティを出力するよう設定が必要。
- extensions + spawnタイミングの例は このコミット
- マテリアルへのextensions追加はBlender Add-on作成が必要。こちらの場合gltfエクスポート時、カスタムプロパティの出力を無効化する必要がある(らしい)。なぜかは未調査。extras も extensions も出力したいなら Add-on で明示的にやる必要があるらしい。
覚え書き#
- bevy_pbr/src/render/view_transformations.wgsl に各種View系?座標変換ヘルパ関数が存在する
- Vertexシェーダーにて便利:
- View座標系を取得してカメラからの距離(Z)に応じたエコーレーダー風エフェクトを乗せる
- Clip座標系を取得して画面上ベースのノイズを乗せる
- Vertexシェーダーにて便利:
- bevy_pbr/src/render/mesh.wgsl
- PBR (というより
Mesh?) の Vertex シェーダと思われる- Extended MaterialのVertexシェーダの一部をいじるときにこれをコピペするのがよさそう?
- PBR (というより
- bevy_pbr/src/render/pbr.wgsl
- PBR の Fragmentシェーダ
- Extended MaterialのFragmentシェーダの一部をいじるときにこれをコピペするのがよさそう?
- Meshlet やら Prepass Pipeline やらの
#ifdefがたくさんある
- Meshlet やら Prepass Pipeline やらの
- Extended MaterialのFragmentシェーダの一部をいじるときにこれをコピペするのがよさそう?
- PBR の Fragmentシェーダ
- bevy_pbr/src/render/forward_io.wgsl
- Forward IO の
Vertex、VertexOutputの定義- Prepass使わないならこれでいい・・・はず?
- Forward IO の
- bevy_pbr/src/render/pbr_types.wgsl
StandardMaterial、およびPbrInputの定義